Map Guide by
danryan Map by
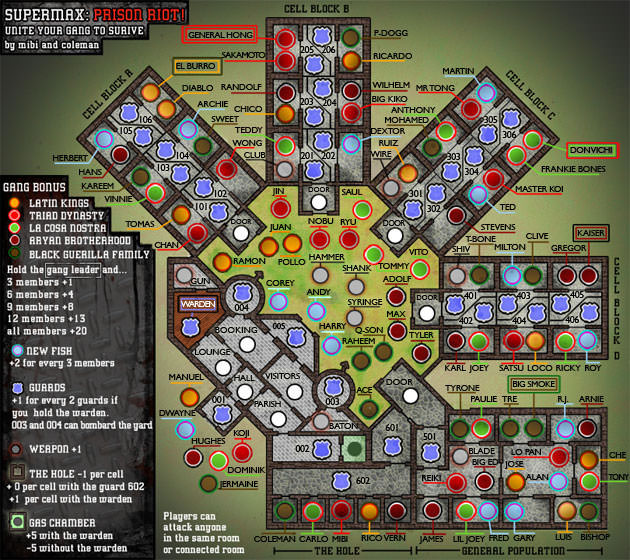
mibi Click image to enlarge. Introduction This map, inspired by a riot in a Supermax security level prison, is one of the larger maps Conquer Club has to offer with 143 total regions. Supermax has very different game play from most other maps due to Strategic Resources and Collections. As a result the bonus awarding regions are non-contiguous and scaleable. Strategic resources provide a bonus for holding a combination of regions providing a bonus (Warden and Guards, Gangs and Leaders) while Collections provide a bonus for having a specific number of designated regions (New Fish). It is important to note that the gangs are frequently classified as Collection bonuses but without holding the gang leader they are worthless; therefore they are a Strategic Resource.
Because of its size, Supermax works well for 4-8 player games. Any spoils or reinforcements work well on this map. This map also works well with or without fog of war; however playing it a few times without fog is recommended before adding to the complexity with fog. I would caution against assassin games on Supermax with fog of war because the amount of influence blind luck plays increases tremendously. This is due to the number of isolated regions in each of the cell blocks - even with snapshots and good deductive reasoning you will have to blindly blunder around the cell blocks to find that final troop your opponent has hidden away!
show: Classification
Size: Very LargeFeatures Bombardments : 003 and 004 can bombard any region in the Yard.Collections : A +2 bonus is awarded for every 3 New Fish held.Dead Space : The cell block doors and the area inside the headquarters (Booking, Visitors, Parish, Hall, and Lounge) are not part of any bonus.Naming Challenges : The Guards are numbered sequentially, meaning a mistake in the drop is fairly easy to make with the drop down menu.Negative Bonus : The Gas Chamber held without the Warden is a (-5) to deployment; each cell in the Hole (Coleman, Carlo, Mibi, Rico, Vern) is a (-1) to deployment if held without 602.Starting Neutrals : All Guards, cell block doors, weapons, and the Warden begin neutral.Strategic Resources :Gang bonuses are awarded for holding the gang leader and either 3 (+1), 6(+4), 9(+8), 12(+13) or all (+20) members of that gang. Guard bonuses of +1 per two Guards held are awarded if the Warden is held. A +5 bonus is awarded for holding the Gas Chamber if the Warden is held. A +1 bonus is awarded per cell held in the Hole if the Warden is held.
How to play Supermax: Prison Riot! show: Two Player
Each player starts with 28 regions, giving you a minimum of 9 troops to deploy; however because of the collections bonus system of the map, players will often start with Gang bonuses or New Fish bonuses. It is therefore a good idea to reduce your opponent's bonus by taking their New Fish so they will have a total of 2, 5, or 8 (Because you receive 2 troops for every 3 New Fish you control, dropping the number of their New Fish in this manner will lower their bonus by 2). Alternatively, you could take Gang members for which they have leaders so they have 2 or 5 gang member regions (they will get a bonus for having 3 or 6 members plus the leader so if you reduce them to 2 or 5 members you will lower their bonus).
show: Escalating
Supermax makes for a unique escalating game due to the openness of the yard and general population combined with the cell blocks, which have multiple bottlenecks. Due to the size of the map and the fact that it will last 10+ rounds for most escalating games it is usually beneficial to hold a bonus. Also, try to keep at least one region in each of the cell blocks, the yard and general population so that you have more access to different parts of the map. Depending on the initial troop drop, you may have regions that are difficult to access; however it is likely that there will be at least a few regions that are protected by neutrals if you play a large player game. This map works well with 5-8 players for standard or terminator games. Fog of war combined with the numerous bottlenecks means that it may be difficult to determine where a player's last regions are and how well protected they are. As a result, cautious play is recommended to avoid leaving an easy elimination for another player.
show: Flat Rate, Nuclear, and No Spoils
Due to the size of of the map, flat rate, nuclear, and no spoils will play very similarly. It will almost never be beneficial to kill someone for their cards. In the beginning, you want to pick up some small bonuses that you know you will hold for a while. As the game progresses, you want to take areas of the map that you can protect but are not heavily occupied by an opponent. For example, if you take an entire cell block, you can limit all of those regions to one point of entry, their door (similarly general population and the hole can be blocked by taking door and taking Guard 005 can limit a large area to one access point). Once you have taken an area, you should try to expand to increase your bonus while making sure not to overextend. Be warned that, like many other maps, no spoils and flat rate games can become build games.
show: Team Games
Some general advice on the order of importance of areas/bonuses:Doubles Triples/Quadruples
show: Additional Notes
1) If you hold the yard, watch out for the 003 and 004 Guards which can bombard. This is especially important when you have lots of single troop regions in the yard, because you can lose your foothold in the yard through bombardment by just a few troops and reduce your troop drop by a significant amount.
Other related strategy guides Berlin 1961 Guide - although the size of the map is completely different, in terms of features Berlin is somewhat similar to Supermax.Age of Merchants Guide - a much more open map than Supermax, it features Strategic Resources similar to the ones found on Supermax.