Cairns Coral Coast Map by
cairnswk Guide by
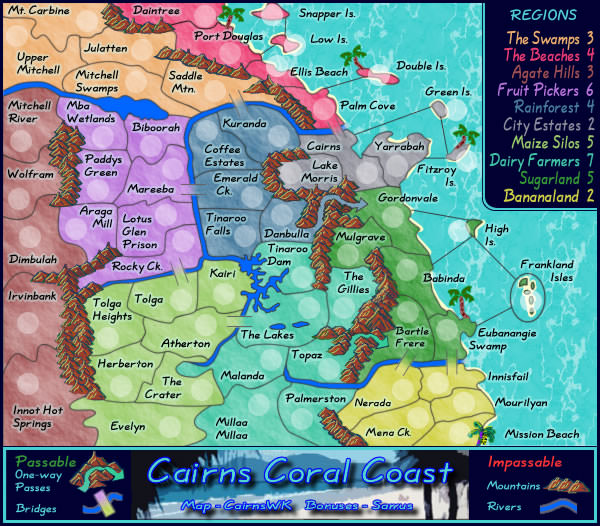
stahrgazer Click image to enlarge. Introduction A standard play map with one twist - one-way borders, denoted by colorful arrows - cairnswk's very first carto-cutting map features his home region in North Queensland Australia with coconut and banana trees, stunning mountains, and tropical islands. Launched May 2007, Cairns Coral Coast was a sign of good things to come; the map maker went on to create 26 other maps in only three years and helped establish the
Map Foundry to assist other map makers who work hard to add to the fun and variety on Conquer Club.
show: Classification
Size: Very large, at 60 regions. Bonuses: Balanced. Ten bonus zones; at least two regions in each bonus zone can be assaulted from other bonus zones. Complexity: Simple.Features One-Way Borders. Dunbulla and Topaz cannot be assaulted from their eastern border regions (note the arrows).
Recommended Play The map is large enough to make for great teams play, especially quads, at any spoils setting, with or without fog of war. Even manual deployments can work for team games on Cairns Coral Coast.
show: Bonus Zones
Bananaland...... ( +2)... 5 regions... 2 vulnerable... 3 assault points - 2 other zones City Estates...... (+2)... 5 regions... 2 vulnerable... 3 assault points - 3 other zones Agate Hills....... (+3)... 5 regions... 3 vulnerable... 3 assault points - 2 other zones The Beaches..... (+4)... 7 regions... 3 vulnerable... 3 assault points - 2 other zones The Swamps..... (+3)... 5 regions... 3 vulnerable... 4 assault points - 3 other zones Rain Forest...... (+4)... 5 regions... 4 vulnerable... 4 assault points - 4 other zones Maize Silos.......(+5)... 7 regions... 4 vulnerable... 5 assault points - 3 other zones Fruit Pickers..... (+6)... 7 regions... 5 vulnerable... 5 assault points - 4 other zones Sugarland......... (+5)... 7 regions... 5 vulnerable... 7 assault points - 4 other zones Dairy Farmers.... (+7)... 7 regions... 6 vulnerable... 7 assault points - 4 other zones With many maps, aiming for the smaller bonuses is the better choice, but that is not necessarily as viable on Cairns Coral Coast. You need to review how many regions within the bonus zone must be defended from how many exterior regions. "How many other bonus zones can assault into this one?" is also a viable question. Assuming each player takes a bonus zone, a bonus zone that can be assaulted from only two other bonus zones may be easier to defend than if you take a bonus zone that can be assaulted from three or four different bonus zones, if you have enough defensive troops to protect all your vulnerable regions.Bananaland and City Estates are slightly easier to defend other bonus zones because only 2 regions are vulnerable in each of these zones. City Estates must defend its two regions from three different bonus zones, but that also means it can reach (to break) three bonus zones – Bananaland defends against two different bonus zones. Agate Hills yields an additional troop bonus but must defend three regions, so with a proper drop, The Beaches could be advisable over Agate Hills. The Beaches' 7 regions seem daunting, but the player who receives at least half this bonus zone on the drop will find it worth taking and as easy to hold as Agate Hills; possibly easier because so many of its regions are shielded: only three are vulnerable to assault from 3 exterior regions, and only from two different bonus zones. The Swamps' close grouping makes it easier to take; but with 4 regions to protect, it is more vulnerable. Whether to take a bonus zone, and which to strive for, depends on the drop and ability to defend more than the number of regions that must be held.
How to play Cairns Coral Coast show: Two Player
Each player begins with 20 regions, giving the starting player 6 troops to deploy; and leaves 20 neutral regions to hide behind or interfere with your bonus zone. The key to this map for 1v1 games is that there really is no single key. Make choices based on the initial drop, region count advantage strategy to increase your troops and reduce opponent troops; look for opportunities to take uncontested bonus zones, sure, but still focus on the opponent! In subsequent turns, re-evaluate and strengthen in areas where the opponent is stronger so that you can prevent his taking a bonus or getting an advantage in region count. The newer player may want the sunny (no fog of war) setting to ensure all options are visible; while the advanced player will find fog of war more challenging. If the player is not dropped on a bonus zone, he or she may be tempted to aim for a bonus zone right away, but taking a bonus zone may not be the best option. Depending on the drop, it might be more viable to just clear the opponent from regions within the bonus zone you think you can gain and hold; but wait to conquer the neutral regions within the zone in future turns. If, however, you can clear the opponent, maintain strength, and perhaps have some neutral regions to shield you, go for it now. In many games, the aim is for region count advantage over bonuses. In Cairns two-player games, reducing the opponent’s first turn starting troops requires taking 3 regions, but be careful not to weaken yourself. Areas to look for other than where to clear bonus zones are where you have a few regions grouped next to a few opponent regions. Remember troop placement (for assault) strategy: Placing 1 additional troop on several of your regions gives you the chance to asault 4v3 a few times (3 intensity cubes v. 2 intensity cubes from each 4-troop region) even if first rolls are not successful; whereas, if you place 2 troops on 1 region, that 5v3 gives you one 3-cubes roll if first roll is not successful). Success at taking 3 regions means the opponent must take three regions to reduce your 2nd round deployment troops from 7 back to 6 (and with only 5 deploys to work with). If you planned carefully, he may not be able to do that. If you left a string of single-troop defenses, he will probably turn the tide on you...so do try to remember to leave at least 2-troop defenses near opponent regions. Similarly, if the opponent is successful at reducing your deployments, he has increased his deployments, but may have weakened himself so that you can gobble up some single-troop regions. If you have the choice between taking a small bonus or increasing your region count while reducing the opponent’s count, assault the opponent; you can always take neutral regions out for a bonus region next round. In other words, standard play is in order for this map; hit the opponent first, hit neutral regions only when it is really in your best interests to do so. Please, trust all the guide authors who say repeatedly, "It is rarely in your best interest to hit a neutral region for a bonus on classic style maps, especially when the opponent is getting more than 3 troops to deploy." A 1v1 game on the manual deployments setting will either be really fun or really dull. With 40 manual deployment troops, the first player is likely to annihilate the opponent. With 20 neutral regions to hide behind, however, it is possible to have a balanced game, one where each player gains enough strength in a particular region to make for challenging play, but that is unlikely, so in general, avoid the setting.
show: Multiplayer games
Cairns Coral Coast is a great map for multiplayer games. Even in 8-player games, each player receives sufficient regions that obtaining any bonus zone on the initial drop is feasible; but each bonus zone has regions vulnerable to at least two other bonus zones, so there is less chance of one player being able to isolate and build unchecked, and more chances for a true, balanced, free-for-all battle. Players.....Regions..... Manual Troops 2............ 20............ 40 3............ 20............ 40 4............ 15............ 30 5............ 12............ 24 6............ 10............ 20 7............. 8............ 16 8............. 7............ 14Some Valuable Long Reach Regions The Crater, Mareeba, and Julatten reach 5 regions, and into one other bonus zone. Babinda can reach 5 regions within its own bonus zone. Kuranda assaults three regions, reaching two bonus zones beside its own. Danbulla and Topaz are valuable because they can assault their eastern region, one way. Dead ends on the map are Daintree, Double Is. and Snapper Is. in The Beaches; and with so many starting regions, a player is unlikely to be cornered. Standard multiplayer tactics are in order: attempt to build where you can reach other players, preparing for the moment when eliminating an opponent is viable. Obviously, this plan is easier when the game includes escalating spoils, since at ten troops maximum, flat rate does not typically provide enough power in one round for that elimination. Because so many border regions can be reached from more than one exterior region, sharing regions for spoils by assaulting and leaving only one troop at the front while you build behind, with an opponent or opponents doing the same in their turn, is a viable tactic. Manual deployments are inadvisable for any number of 1v.all players. Each player will receive a substantial number of troops, enough that the game could be decided in the first rounds. The most likely scenario, even in 8-player games, is early troop stack vs. troop stack clashing to possess “corner” bonuses, with the winner(s) of those battles continuing to play while the others are quickly eliminated for region count and spoils. Terminator and Assassin settings are likely to be more challenging than on many other maps. Several regions have similar reach, with a few additional regions that have specific advantages, so games on Cairns Coral Coast will be more balanced on the initial drop than other maps; each player will likely be just as likely to start from a winning set of regions as any other player. The one disadvantage would be an Assassin game player whose larger forces are gathered in Innot Hot Springs while the target is cornered in Daintree. Well, you began with at least 7 regions, so it’s your own fault if you let that happen.
show: Team Games
Teams will find Cairns Coral Coast a versatile map, one where a variety of strategies will work. With ample room and bonuses, each player could focus on clearing a specific bonus zone; or the team could pile onto one or two mates for main assault thrusts. The play itself will not vary much from team play on any other classic-style map, but teams should remember, when deciding on strategy, that Cairns Coral Coast has ample room to expand from one bonus zone to the next. Bottlenecks between bonus zones allow an in-depth defense and make competitive tactics that include sweeping from one point outwards. For example, from Swamps you or your team mate grabs The Beaches; or from Bananaland you or your team mate grabs Sugarland. Defend by stacking assault/defense troops just outside the bonus zone with only a few defense troops behind: Bananaland could be defended with a stack on Palmerston and a 2 on Nerada, with additional stacks in Sugarland and a 2 on Innisfall. While one teammate holds the rear bonus, the next teammate protects the front and expands into adjacent bonus zones without creating more defense points that must be held. It should be obvious that these tactics often work best from bonus zones at the corners or edges of the map; bonus zones that cannot be penetrated from all sides, so that the regions to be defended are limited. Which spoils setting is a matter of preference. With so many bonuses no spoils might be the most challenging, and as such, is the overwhelming favorite for triples and quads team play, but the popular escalating works well, also. Flat rate can be fun, although if one team is getting all the “rainbow” multicolor sets for 10 troops and the other team is getting all 4-troop red sets – unlikely, but possible – the game will be decided based on spoils; still, if you check the numbers of played games, flat rate is the most popular setting for doubles on Cairns Coral Coast. Even manual deployments will work well for team games; while one player’s main stack(s) could be quickly reduced by the first player to go, with so many regions to hide him, his teammates will probably remain strong enough to protect and take revenge.
show: Spoils
For many maps, flat rate and no spoils games are likely to degenerate into luck-based games. In flat rate, the first person with a rainbow (one of each color, valued at 10 bonus troops) cash may be able to take and hold a bonus zone for the additional troops needed to carry to victory. This chance is lessened on Cairns Coral Coast for games with less players; there are so many neutral regions that a player with an early ten-troop cash is unlikely to be able to annihilate the opponent hiding behind them. Escalating spoils may be the most popular setting on Conquer Club, and will work well on this map, especially for multiplayer games, although many players tend to prefer other spoils settings for this map, as was noted earlier. Use the general strategy of trying to keep strong in several multi-reach regions while getting a card each round until spoils cashes are high; if you are too grouped in one area, you may be too isolated to be able to use spoils cashes effectively. With no spoils multiplayer games, the intensity cubes rather than the spoils draw, can easily decide the victor as one player “lucks out” to obtain and defend an early bonus zone; while team games with no spoils requires additional strategy about where and when to assault opponents or strive for a bonus. Nuclear spoils could be a fun way to break a bonus, and with so many regions, players have plenty of room to sprawl so that their stack is unlikely to be annihilated. Players who prefer to play with no spoils may find nuclear spoils a viable option to compensate for one-way intensity cubes luck.
show: Other Related Strategy Guides
show: Similar Maps
Midgard – 46 regions, one way borders Europe – 48 regions, one way border San Francisco – 42 regions, one way border, double dipping, trapped region Siege – 56 regions, double dipping, one way border Texan Wars – 57 regions, one way borders, dead space, double dipping